This is the first part of a multi-part post series I’m going to write about Code Generation using C#.
I’ve mentioned before that I’ve been a fan of code generation for a long-time. I have used CodeSmith generator, MyGeneration Code Generator, and in the past few years, I’ve been using T4 templates.
The main advantage of code generation (which includes DB scaffolding, also called database first by some ORMs) is that it does the work for you, is repeatable, and less error-prone than manually writing everything. So it’s mostly about productivity and consistency. If you’re writing repetitive code by hand, you’re stealing from your employer or clients. And if you have a data-oriented application, almost certainly you have repetitive code to some degree.
The right tool for the job
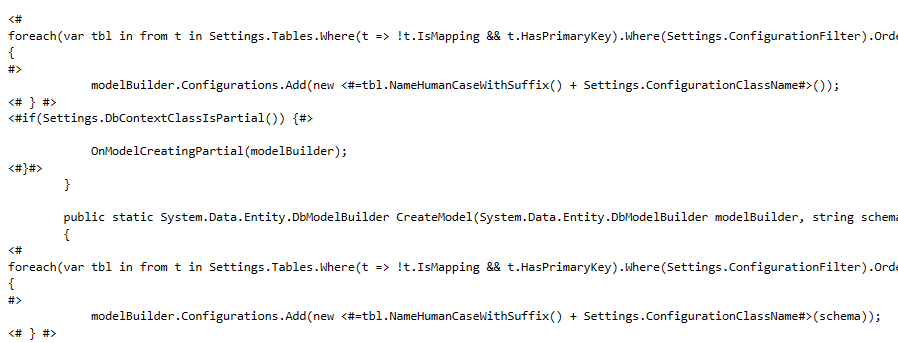
Until recently the gold standard for code generation in Microsoft stack was using T4 templates, which is the out-of-the-box tool provided by Microsoft and shipped with Visual Studio. The major problem with T4 is that it has terrible syntax, terrible tooling and debugging support, and can get as ugly as this:
C# Script Files (CSX files)
In the search of a modern code-generation tool I’ve explored Razor Templates, Mustache, and Mustache-like templates (like DotLiquid and Handlebars), and others. I’ve noticed that there’s a growing popularity of using C# code (Roslyn or not) to do the code-generation using pure C# - which makes sense, since you can get strong typing, compile-time checking, full IDE support (with debugging), cross-platform (dotnet core), full access to all .NET Framework (SqlServer, Dapper, Newtonsoft JSON, etc). So you get a full-fledged language instead of using a templating-engine which only offers a subset of features of the underlying language.
C# Script Files (CSX) were introduced with Roslyn, and can be executed in Roslyn or in other compatible cross-platform scripting engines like dotnet-script or even with C# REPL called csi.exe.
Those scripting engines certainly have some limitations (like using namespaces), but they allow us to virtually invoke any C# code, with essential features like loading external assemblies, loading code organized across multiple source files, etc. And it’s much easier than using Powershell to invoke C#.
Sample CSX Script
CSX scripts inside Visual Studio have some support for Intellisense (auto-completion) and compile-time checks, but those features work much better in CS files. So it’s a good idea to put as much as possible into cs files and as little as possible in CSX scripts. I like to use CSX only for basic things like loading libraries, setting connection strings, settings paths, and invoking the real code in CS files.
MyProgram.cs:
public class MyProgram
{
   public void MyMethod()
   {
      Console.WriteLine("Hello from MyMethod");
   }
}
MyScript.csx:
#load "MyProgram.cs"

new MyProgram().MyMethod();
Console.WriteLine("Hello Code-Generation!");
Running CSX Script using C# REPL (CSI.EXE)
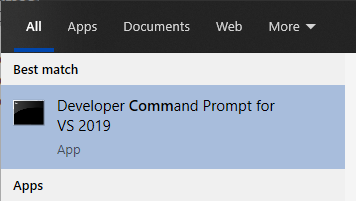
Visual Studio ships with a command line REPL called CSI that can be used to run .csx scripts.
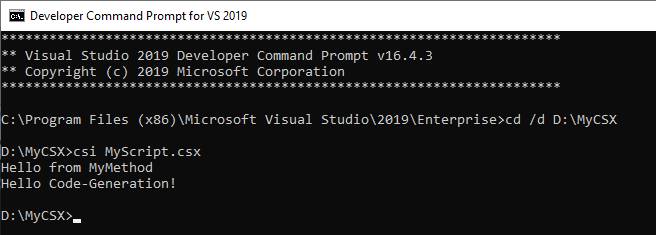
You can run CSI.EXE directly from Visual Studio Developer Command Prompt (csi MyScript.csx):
Assembly References
In the same sense that it’s a good idea to use simple statements in CSX to invoke more complex CS code, it’s also a good idea to load external assemblies when you can rely on existing libraries.
CSX allows loading assembly references by using the #r directive in the top of your scripts:
// CSI.EXE requires absolute paths for loading external assemblies:
#r "C:\Users\drizin\.nuget\packages\dapper\2.0.35\lib\netstandard2.0\Dapper.dll"

#load "File1.cs"
#load "File2.cs"
#load "MyProgram.cs"

new MyProgram().MyMethod();
Console.WriteLine("Hello Code-Generation!");
NuGet Packages
If you need to reference a NuGet package, you can just rely on NuGet tools (and Visual Studio build process) to automatically restore the packages required by your script. For achieving that, you can just add the CSX as part of a Visual Studio project, so when each developer tries to build the project Visual Studio will download the missing packages, and the developer just needs to fix the assemblies location.
Another alternative, which does not require to use csproj at all, is using PowerShell to download the required nugets (see script at the end of this post).
Invoking C# REPL (CSI running CSX scripts) from PowerShell
Although you can run CSI.exe directly from Visual Studio Developer Command Prompt, invoking it through PowerShell is very helpful for a few reasons:
- You can run outside of Visual Studio. You don’t even need Visual Studio to run CSX.
- Allows us to find NuGet locations and reference external assemblies with relative paths on the CSX (more about this below).
- Restoring NuGet files (example script at the end of the post)
To invoke CSI using Powershell, we must know the location of csi.exe.
CSI is shipped with Visual Studio but can also be installed by using the NuGet package Microsoft.Net.Compilers.Toolset (warning: as described here the installation script for the package changes .csproj file to use the compiler provided by the package - this is likely not what you want, so make sure to roll-back such changes if they are made during installation).
So the first step is to search for csi.exe in multiple locations as I show in the sample Powershell script RunMyScript.ps1 below:
# Locate CSI.EXE by searching common paths
$csi = (
    "$Env:userprofile\.nuget\packages\microsoft.net.compilers.toolset\3.6.0\tasks\net472\csi.exe",
    "$Env:programfiles (x86)\Microsoft Visual Studio\2019\Enterprise\MSBuild\Current\Bin\Roslyn\csi.exe",
    "$Env:programfiles (x86)\Microsoft Visual Studio\2019\Professional\MSBuild\Current\Bin\Roslyn\csi.exe",
    "$Env:programfiles (x86)\Microsoft Visual Studio\2019\Community\MSBuild\Current\Bin\Roslyn\csi.exe",
    "$Env:programfiles (x86)\Microsoft Visual Studio\2017\Enterprise\MSBuild\15.0\Bin\Roslyn\csi.exe",
    "$Env:programfiles (x86)\Microsoft Visual Studio\2017\Professional\MSBuild\15.0\Bin\Roslyn\csi.exe",
    "$Env:programfiles (x86)\Microsoft Visual Studio\2017\Community\MSBuild\15.0\Bin\Roslyn\csi.exe"
) | Where-Object { Test-Path $_ } | Select-Object -first 1

$dir = Split-Path $MyInvocation.MyCommand.Path
$script = Join-Path $dir "MyScript.csx"

& $csi $script
To launch the PowerShell script from the command line, it’s just about running Powershell Full-Path-To-Your-Script-ps1.
Running from Visual Studio IDE
To run from Visual Studio, you can just add the PS1 to your project or solution, right-click the file, and click the option “Open with PowerShell ISE”, which is the IDE for editing/running PowerShell scripts.
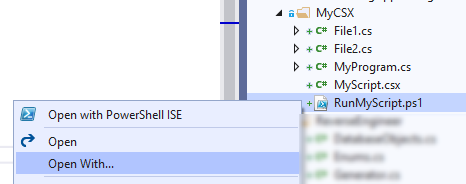
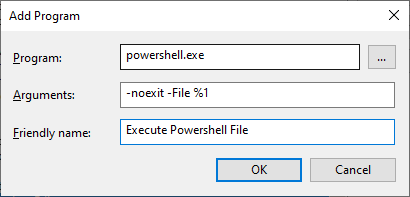
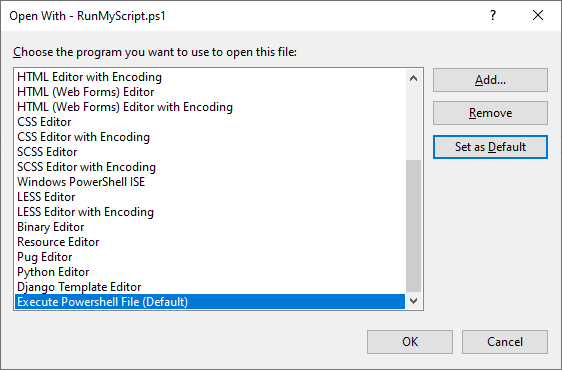
Another alternative is that you can add new actions to your right-button actions - you can click “Open With…” and configure PowerShell to be executed directly from Visual Studio:
The list of possible actions will include this new option of invoking PS1 scripts directly from the IDE, and you can also set this as the default action for opening PS1 files.
Allowing Unsigned Scripts
If you have never executed unsigned PowerShell scripts you’ll have to enable PowerShell unsigned scripts by running Powershell as Administrator and running this command:
Set-ExecutionPolicy -ExecutionPolicy Unrestricted.
Don’t forget to enable for both Windows PowerShell (64-bits) and for Windows PowerShell (x86), which is the one that is invoked from inside Visual Studio IDE.
Relative Assembly References
As we’ve seen before, CSX accepts absolute references like this:
#r "C:\Users\drizin\.nuget\packages\dapper\2.0.35\lib\netstandard2.0\Dapper.dll"
One of the major problems with CSI is that the #r directive (for loading assembly references) doesn’t accept nuget-like references or environment variables so all assembly references should be specified with full paths. This is not a showstopper but it’s a little annoying since it makes it harder to share code among multiple developers since each developer would have to fix their references.
One of the advantages of using PowerShell (as described above) is that we can use environment-variables and use #r directive with relative paths. In the PowerShell script, we just have to locate the base path where your assemblies are located and pass that to CSI so it can use this folder to search for referenced assemblies, like this:
$assemblies = "${env:userprofile}\.nuget\packages\";
& $csi /lib:"$assemblies" $script
And then in the CSX, you can use relative paths like this:
#r "dapper\2.0.35\lib\netstandard2.0\Dapper.dll"
PackageReference (NuGet 4) vs packages.config (NuGet 3)
The new MSBuild format (“SDK-Style”, which uses PackageReference inside the csproj) installs the NuGet packages in this per-user folder.
The old MSBuild format (“non-SDK-Style”, before Visual Studio 2017, which uses packages.config) installs the NuGet packages in the “packages” folder under the Solution folder.
We can adjust our PowerShell scripts according to where our project will restore NuGet packages:
$csi = ... # (locate your csi.exe)
$dir = Split-Path $MyInvocation.MyCommand.Path
$script = Join-Path $dir "MyScript.csx"

# Call csi.exe and specify that libraries referenced by #r directives
# should search in a few nuget locations

# New NuGet 4.0+ (PackageReference) saves User-specific packages
# in "%userprofile%\.nuget\packages\"
$nuget1 = "${env:userprofile}\.nuget\packages\";

# New NuGet 4.0+ (PackageReference) saves Machine-wide packages
# in "%ProgramFiles(x86)%\Microsoft SDKs\NuGetPackages\"
$nuget2 = "${env:ProgramFiles(x86)}\Microsoft SDKs\NuGetPackages\";

# Old NuGet (packages.config) saves packages in "\packages" folder at solution level.
# Locate by searching a few levels above
$nuget3 = (
    (Join-Path $dir ".\packages\"),
    (Join-Path $dir "..\packages\"),
    (Join-Path $dir "..\..\packages\"),
    (Join-Path $dir "..\..\..\packages\"),
    (Join-Path $dir "..\..\..\..\packages\")
) | Where-Object { Test-Path $_ } | Select-Object -first 1

# if you're using new NuGet format (PackageReference defined inside csproj)
& $csi /lib:"$nuget1" $script

# if you're using old NuGet format (packages.config)
# & $csi /lib:"$nuget3" $script
And our CSX would use relative references:
// CSX can load libraries by defining their relative paths

// New NuGets (PackageReference) are installed under "${env:userprofile}\.nuget\packages\"
// or "${env:ProgramFiles(x86)}\Microsoft SDKs\NuGetPackages\")
// and have this format:
#r "dapper\2.0.35\lib\netstandard2.0\Dapper.dll"

// Old NuGets (packages.config) are installed under "(SolutionFolder)\packages"
// and have this format
// #r "Dapper.2.0.35\lib\netstandard2.0\Dapper.dll"

//...
new MyProgram().MyMethod();
Console.WriteLine("Hello Code-Generation!");
So cool and so easy, isn’t it?
Other tools
I have played with other tools like dotnet-script, nake, and the popular scriptcs. For different reasons I couldn’t make any of them work fine (some weren’t even installing in a traditional .net framework project, some had complex methods for using nugets, and some simply weren’t working (not finding include files, etc)). So I decided to stick with the plain csi.exe, which most users will already have installed.
Final PowerShell Script
This script below has some nice features:
- Allows to search for assemblies in multiple paths, including all NuGet locations
- Can pass multiple paths to csi.exe, even though csi does not accept spaces in paths
- Can restore missing NuGet packages (will even download nuget.exe)
# To Execute Powershell Scripts from Visual Studio:
# 1) Right-button PS1 file - "Open With...""
# 2) Configure:
# Program: Powershell.exe
# Arguments: -noexit -File %1
# Friendly Name: Execute PowerShell Script
# To execute CSX scripts you'll need CSI.EXE (C# REPL) which is shipped with Visual Studio
# but can also be installed by using the NuGet package Microsoft.Net.Compilers.Toolset - https://www.nuget.org/packages/Microsoft.Net.Compilers.Toolset/
# For more info about launching CSX scripts from PowerShell or from Visual Studio, check https://drizin.io/code-generation-csx-scripts-part1/
$dir = Split-Path $MyInvocation.MyCommand.Path
$script = Join-Path $dir ".\GenerateSimplePOCOs.csx"
$requiredLibs = @(
@{ Name = "Newtonsoft.Json"; Version = "12.0.3" },
@{ Name = "CodegenCS"; Version = "1.0.5" }
);
# By default we'll only use NuGet 4 locations. But you can change to 3 if you're hosting
# your scripts in a project with the old packages.config format and want to rely on existing project packages
$NuGetVersion = 4;
$ErrorActionPreference = "Stop"
# Locate CSI.EXE by searching common paths
$csi = (
"$Env:userprofile\.nuget\packages\microsoft.net.compilers.toolset\3.6.0\tasks\net472\csi.exe",
"$Env:programfiles (x86)\Microsoft Visual Studio\2019\Enterprise\MSBuild\Current\Bin\Roslyn\csi.exe",
"$Env:programfiles (x86)\Microsoft Visual Studio\2019\Professional\MSBuild\Current\Bin\Roslyn\csi.exe",
"$Env:programfiles (x86)\Microsoft Visual Studio\2019\Community\MSBuild\Current\Bin\Roslyn\csi.exe",
"$Env:programfiles (x86)\Microsoft Visual Studio\2017\Enterprise\MSBuild\15.0\Bin\Roslyn\csi.exe",
"$Env:programfiles (x86)\Microsoft Visual Studio\2017\Professional\MSBuild\15.0\Bin\Roslyn\csi.exe",
"$Env:programfiles (x86)\Microsoft Visual Studio\2017\Community\MSBuild\15.0\Bin\Roslyn\csi.exe"
) | Where-Object { Test-Path $_ } | Select-Object -first 1
if (!$csi)
{
Write-Host "---------------------------------------" -for red
Write-Host "Can't find csi.exe" -for red
Write-Host "Please fix search paths above, or install NuGet Microsoft.Net.Compilers.Toolset" -for red
Write-Host "---------------------------------------" -for red
Exit 1
}
Write-Host "Found csi.exe: $csi" -for cyan
# List of locations to search for assembly references
$libPaths = @()
$libPaths += $dir
if ($NuGetVersion -eq 4)
{
# New NuGet 4.0+ (PackageReference) saves User-specific packages in %userprofile%\.nuget\packages\
$libPaths += "${env:userprofile}\.nuget\packages";
if (Test-Path "${env:userprofile}\.nuget\packages") { $missingNuGetPackagesLocation = "${env:userprofile}\.nuget\packages" }
# New NuGet 4.0+ (PackageReference) saves Machine-wide packages in %ProgramFiles(x86)%\Microsoft SDKs\NuGetPackages\"
$libPaths += "${env:ProgramFiles(x86)}\Microsoft SDKs\NuGetPackages";
}
if ($NuGetVersion -eq 3)
{
# Old NuGet (packages.config) saves packages in "\packages" folder at solution level.
# Locate by searching a few levels above the script
$missingNuGetPackagesLocation = (
(Join-Path $dir ".\packages"),
(Join-Path $dir "..\packages"),
(Join-Path $dir "..\..\packages"),
(Join-Path $dir "..\..\..\packages"),
(Join-Path $dir "..\..\..\..\packages")
) | Where-Object { Test-Path $_ } | Select-Object -first 1
$libPaths += $missingNuGetPackagesLocation
}
# where to download missing NuGet packages
if ((Test-Path $missingNuGetPackagesLocation) -eq $false)
{
$missingNuGetPackagesLocation = $dir
}
# csi /lib parameter allows multiple paths but does not accept spaces (or quotes) so we have to use short DOS 8.3 paths
$fso = New-Object -ComObject Scripting.FileSystemObject
$libPaths = ($libPaths | Where-Object { Test-Path $_ } | ForEach { $fso.GetFolder($_).shortpath });
Write-Host "CSI will use the following paths to search for assembly references:`r`n - $($libPaths -Join "`r`n - ")" -for cyan
$missingLibs = @()
$requiredLibs | foreach {
$requiredLib = $_;
Write-Host "Checking for $($requiredLib.Name) version $($requiredLib.Version)..." -for Cyan -NoNewLine
if ($NuGetVersion -eq 4)
{
# NuGet 4+ format
$found = $libPaths |
ForEach { Join-Path $_ ($requiredLib.Name + '\' + $requiredLib.Version) } |
Where-Object { Test-Path $_ } | Select-Object -first 1
if ($found -eq $null)
{
Write-Host "`n$($requiredLib.Name) not found. Will install using NuGet" -for Yellow
$missingLibs += $requiredLib
}
else
{
Write-Host "Found: $found" -for Cyan
}
}
if ($NuGetVersion -eq 3)
{
# NuGet <=3 format
$found = $libPaths |
ForEach { Join-Path $_ ($requiredLib.Name + '.' + $requiredLib.Version) } |
Where-Object { Test-Path $_ } | Select-Object -first 1
if ($found -eq $null)
{
Write-Host "`n$($requiredLib.Name) not found. Will install using NuGet" -for Yellow
$missingLibs += $requiredLib
}
else
{
Write-Host "Found: $found4 $found3" -for Cyan
}
}
}
if ($missingLibs)
{
$nuget = Join-Path $env:TEMP "nuget.exe"
if ((Test-Path $nuget) -eq $False)
{
Write-Host "Downloading NuGet.exe into $nuget" -for cyan
$webClient = New-Object System.Net.WebClient
$webClient.DownloadFile("https://dist.nuget.org/win-x86-commandline/latest/nuget.exe", $nuget)
}
$missingLibs | foreach {
$missingLib = $_
Write-Host "Downloading $missingLib...";
$libName = $missingLib.Name
$libVersion = $missingLib.Version
if ($libVersion -eq $null)
{
& $nuget install $libName -OutputDirectory $missingNuGetPackagesLocation
}
else
{
& $nuget install $libName -Version $libVersion -OutputDirectory $missingNuGetPackagesLocation
}
if ($lastExitCode -ne 0)
{
Write-host "-------------`nError downloading $missingLib - aborting...`n-------------" -for red
Exit 1
}
}
}
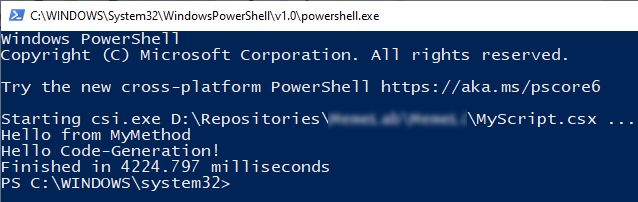
$stopwatch = [System.Diagnostics.Stopwatch]::StartNew()
Write-host "Starting csi.exe $script ..." -for yellow
& $csi /lib:$($libPaths -Join ';') $script
$stopwatch.Stop()
Write-Host "Finished in $($stopwatch.Elapsed.TotalMilliSeconds) milliseconds"
# Since I configured "-noexit" parameter in Visual Studio I don't need this
#if ($host.Name -notmatch 'ISE') { Write-Host -NoNewLine "(Just press Enter to exit)" -for cyan; read-host; }
And my final CSX
/// <summary>
/// This CSX Script will invoke SimplePOCOGenerator, which builds simple POCO classes based on a JSON file with schema of SQL database
/// The easiest way to launch csi.exe (which is shipped with Visual Studio) to run this script is by using PowerShell script GenerateSimplePOCOs.ps1
/// You can do that from Visual Studio (see instructions in RefreshDatabaseSchema.ps1) or you can just execute "Powershell GenerateSimplePOCOs.ps1"
/// </summary>

// System libraries
#r "System.Data.dll"

// Load third-party libraries by their relative paths, relative to "$Env:userprofile\.nuget\packages\"
#r "newtonsoft.json\12.0.3\lib\netstandard2.0\Newtonsoft.Json.dll"
#r "codegencs\1.0.5\lib\netstandard2.0\CodegenCS.dll"

// CS files are better than CSX because Intellisense and Compile-time checks works better.
#load "DatabaseSchema.cs"
#load "SimplePOCOGenerator.cs"

using System;
using System.IO;
using System.Runtime.CompilerServices;
using System.Data;
using System.Data.SqlClient;

// Helpers to get the location of the current CSX script
public static string GetScriptPath([CallerFilePath] string path = null) => path;
public static string GetScriptFolder([CallerFilePath] string path = null) => Path.GetDirectoryName(path);


// locations relative to the CSX script
string inputJsonSchema = Path.GetFullPath(Path.Combine(GetScriptFolder(), "AdventureWorksSchema.json"));
string targetFolder = Path.GetFullPath(Path.Combine(GetScriptFolder(), @".\POCOs\"));
string csProj = Path.GetFullPath(Path.Combine(GetScriptFolder(), @".\CSX-PowerShell-VisualStudio2015.csproj"));

var generator = new SimplePOCOGenerator(inputJsonSchema);
generator.Namespace = "CSX_PowerShell_VisualStudio2015";
generator.Generate(targetFolder, null);
Full source code is available here, with a sample project that reads a JSON file with AdventureWorks database schema and generates POCOs, both for SDK-Style (new csproj format) and for non-SDK-style (old Visual Studio 2015 format).
So cool and so easy, isn’t it?
In my next post, I’ll create a SQL schema extractor, and this schema will be used in next posts to build code generator for POCOs, EFCore, and other related services.
Enjoy!
This was the first part of a multi-part post series I’m going write do about Code Generation using C#: