I’ve been a fan of code generation (mostly for scaffolding data access objects from databases) for a long-time. I have used CodeSmith generator, MyGeneration Code Generator, LINQ to SQL, Rockford Lhotka CSLA, Subsonic Active Record Templates, and more recently Simon Hughes Entity Framework T4 templates.
The main advantage of code generation (which includes “db scaffolding”, also known as database first in some ORMs) is that it does the work for you, is repeatable, and less error-prone than manually writing everything. So it’s mostly about productivity and consistency. If you’re writing repetitive code by hand, you’re stealing from your employer or from your client. And if you have a data-oriented application, almost certainly you have repetitive code to some degree.
I frequently need to make some customizations over the code generation templates, and it’s always a hard task. Most code generators do not have good support for one or more of the following important features:
- Indentation and whitespace control
- Debugging
- Includes (subtemplates)
- Intellisense (code completion)
- Compile-time checking (strong typing)
- Integration with CSPROJ files
Among those, I had one important requirement: the included subtemplates should respect parent indentation, and even if they were multi-line templates those lines should be rendered in the correct position. Or as handlerbars describe , “By default, an indented partial-call causes the output of the whole partial being indented by the same amount.”.
While trying to find a good code generator (to replace what I currently do with T4 Templates) I explored the most popular free tools/libraries for code generation and text templating.
T4 Templates
T4 templates are based on ASPX control blocks <% %>. They tend to get very ugly, have low degree of intellisense/typing (it’s easy to write invalid code and you can only find out debugging which is even harder), have terrible support for indentation, and everytime that I upgrade my Visual Studio the T4 templates totally break, since they are very environment dependent.
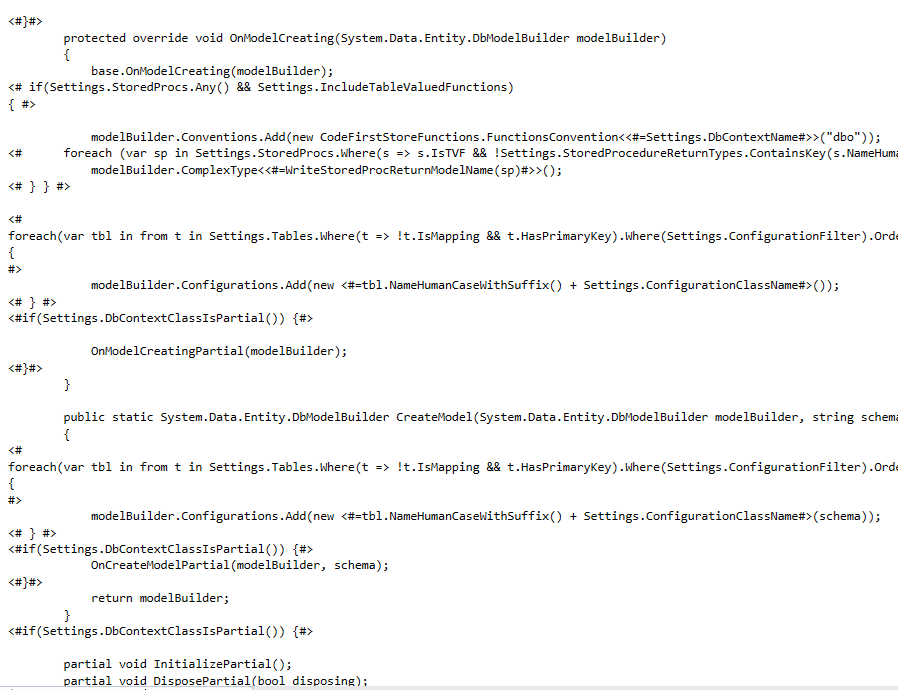
And they look as ugly as this:
Razor Engines
Antaris RazorEngine is the top-leading razor engine, but there are other razor engines like RazorLight and WestWind.RazorHosting.
Razor is more concise (and less ugly) than ASPX control blocks, but for achieving concise code they have to make some “assumptions” about what is control logic and what is output code, and therefore it tries to automagically guess C# code that is intended to control logic so if you write Debug.WriteLine it will assume that this should be interpreted (and not written to output).
If you type an XML tag inside a code block it will automagically assume that it should be written to output (which makes sense, afterall XML tags are not control logic, but yet this gets very confusing). So to make it work you end up using escape characters like @, @{} and @: everywhere.
Razor templates are nice because they have good Visual Studio support (with intellisense and object models, although those unclear distintions between control logic and output code usually make intellisense fail), and allow partials, but unfortunately for having intellisense in partials you would have to split them into indivual files.
RazorEngine is very complete, very stable, and somehow easy to extend, but they have some minor annoyances like saving temporary DLLs (which don’t get deleted) everywhere.
But the major problems with all Razor-based engines is that Razor uses angle-based tags, and therefore is targeted at writing XML/HTML, and a little annoying to write other outputs. Additionally, the Partials (includes) do NOT respect parent indentation level - so if you include a multi-line subtemplate, you’ll get a messy indentation.
Scripty
Scripty describes itself as Tools to let you use Roslyn-powered C# scripts for code generation. You can think of it as a scripted alternative to T4 templates.
It can manipulate CSPROJ files, has support for both .NET Framework and .NET core, and has good indentation support: it has its own TextWriter which keeps tracks of current indent level, and restores this indent level when you start a new line).
It also has great intellisense since it’s scripted using pure C#.
Unfortunately, it does not have integrated templating engine, so writing complex templates can get ugly and cumbersome. Additionally it looks like the author not only does not intend to support any specific templating engine, but also has somehow abandoned the project (and complex open source projects when abandoned usually decline fast unless a new group of supporters fork it into a new project) - so I was a little afraid of putting all my coins into a complex codebase which is not being maintained.
Templating Engines
Currently the most popular templating engines are based on the mustache standard, which is very nice because it uses “double-braces” to define control logic with tags {{ this }}, so you can still use regular single-braces for C# (or Java or any C-Style) code. Although mustache is the first engine using this, it was quickly followed by better alternatives like handlebars.js and Shopify liquid, which are the two most popular engines, and they were both respectively ported to .NET in the libraries Handlebars.Net and Dotliquid. There’s also a new kid on the block called Scriban which is based on Dotliquid but with some improvements, and growing fast.
Although the escape character in all those engines does not conflict with C# code, their syntax is very different from regular C# code (probably easier to parse), so you have to learn a new syntax. Learning a new syntax is not a problem, afterall we all have learned so many different syntaxes over time and old dogs love to learn new tricks, but the problem is that those engines also do NOT have any debugging support, which is a must, specially when you’re not familiar with the syntax, or when you’re writing complex templates. Debugging templates only by the error outputs is like debugging code only with Console.WriteLine when you could be using a real IDE.
Jinja2
Since none of the .NET alternatives fully matched what I was looking for, I also checked the most popular templating engine for non-NET languages.
Jinja2 engine is written in Python, and is similar to Handlebars and Liquid. They have good whitespacing control, good indentation, and a good ecosystem (parsers, editors, etc). However, similarly like Dotliquid and Handlebars.Net, it looks like all those templating tools are NOT focused on code generation but on used-defined-templates (like configuring automatic emails, configuring pages for your ecommerce, etc), so they have a different set of requirements in mind. For those tools it really makes sense to have a simple syntax, a sandboxed security model (isolated AppDomain), and loading templates from strings stored anywhere (like your database). A code generator does not need any of that, but needs good debugging support, good intellisense, and (for those of us who like it) strong typing.
Last, since I’m mostly into C#/.NET, it didn’t look like a good fit to start using a Python engine - especially if I want my templates to be easily adopted by other C# users. I was looking for something similar to T4 templates but with better readability, better tooling, and better reuse.
Writing code using C#
From the tools above, the only one which integrates with msbuild projects (in other words can write into csproj files) is Scripty, so this is where I started my tests. Scripty basically have their own TextWriter (Scripty.Core.Output.OutputFile) and some helpers like a collection of TextWriters for writing to multiple files, and for choosing how each file should be treated by the csproj, etc.
This is Scripty syntax:
w.WriteLine();
w.WriteLine("///<summary>");
w.WriteLine("/// {0}", System.Security.SecurityElement.Escape(c.SummaryComments));
w.WriteLine("///</summary>");
For writing indented code in Scripty you could manually indent your strings like this:
w.WriteLine("finally");
w.WriteLine("{");
w.WriteLine("    dbConnection.Close();");
w.WriteLine("}");
… or you could use their nice indentation helpers which control indentation level for you:
w.WriteLine($"public {Settings.DbContextName}(string connectionString) : base(connectionString)");
w.WriteLine("{");
using (w.WithIndent())
{
    w.WriteLine("InitializePartial();");
}
w.WriteLine("}");
As you can notice, this can get very ugly and cumbersome to write:
w.WriteLine($"{Settings.MigrationClassModifiers} class {Settings.MigrationConfigurationFileName}: System.Data.Entity.Migrations.DbMigrationsConfiguration<{Settings.DbContextName }> ");
w.WriteLine("{");
using (w.WithIndent())
{
    w.WriteLine($"public {Settings.MigrationConfigurationFileName}()");
    w.WriteLine("{");
    using (w.WithIndent())
    {
        w.WriteLine($"AutomaticMigrationsEnabled = { Settings.AutomaticMigrationsEnabled.ToString() };");
        w.WriteLine($"AutomaticMigrationDataLossAllowed = { Settings.AutomaticMigrationDataLossAllowed.ToString() };");
        if (!string.IsNullOrEmpty(Settings.ContextKey))
            w.WriteLine($@"ContextKey = ""{ Settings.ContextKey }"";");
    }
    w.WriteLine("}");
}
w.WriteLine("}");
Pretty ugly, right?
More concise manual indentation
The first helper method that I added to Scripty was something to make manual-indentation less verbose when all I need is to create C-style blocks ( { } ).
With my helpers, creating an indented code block became a little easier because a single statement will both write the line before the block starts, will write the brace which starts the block, will increase indent, and when being disposed it will decrease the indent and will also output the brace which closes the block. So it’s 3 lines (and increasing/decreasing inner indentation) in a single line.
using (w.WithCStyleBlock($"namespace {myNamespace}"))
{
    using (w.WithCStyleBlock($"public class {myClass}"))
    {
         w.WriteLine("// My Properties start here");
    }
}
…this generates this code:
namespace codegencs
{
    public class Test1
    {
        // My Properties start here
    }
}
Another example:
w.WriteLine($"{Settings.MigrationClassModifiers} class {Settings.MigrationConfigurationFileName}: System.Data.Entity.Migrations.DbMigrationsConfiguration<{Settings.DbContextName }> ");
w.WriteLine("{");
using (w.WithIndent())
{
    w.WriteLine($"public {Settings.MigrationConfigurationFileName}()");
    w.WriteLine("{");
    using (w.WithIndent())
    {
        w.WriteLine($"AutomaticMigrationsEnabled = { Settings.AutomaticMigrationsEnabled.ToString() };");
        w.WriteLine($"AutomaticMigrationDataLossAllowed = { Settings.AutomaticMigrationDataLossAllowed.ToString() };");
        if (!string.IsNullOrEmpty(Settings.ContextKey))
            w.WriteLine($@"ContextKey = ""{ Settings.ContextKey }"";");
    }
    w.WriteLine("}");
}
w.WriteLine("}");
Can be simplified into:
using (w.WithCStyleBlock($"{Settings.MigrationClassModifiers} class {Settings.MigrationConfigurationFileName}: System.Data.Entity.Migrations.DbMigrationsConfiguration<{Settings.DbContextName }> ))
{
    using (w.WithCStyleBlock($"public {Settings.MigrationConfigurationFileName}()"))
    {
        w.WriteLine($"AutomaticMigrationsEnabled = { Settings.AutomaticMigrationsEnabled.ToString() };");
        w.WriteLine($"AutomaticMigrationDataLossAllowed = { Settings.AutomaticMigrationDataLossAllowed.ToString() };");
        if (!string.IsNullOrEmpty(Settings.ContextKey))
            w.WriteLine($@"ContextKey = ""{ Settings.ContextKey }"";");
    }
}
As you can see, the boilerplate was condensed into a single statement, and yet the control logic braces/indentation clearly match the output code braces which are implicitally rendered.
(I know that some people will prefer opening braces in the same line - so sorry, you won’t see that helper in my code generator, ever!! :-) just kidding - let’s create a WithJavascriptStyleBlock() for opening block in same line ok? :-) )
Multiline statements and the Mixed Indentations Problem
Even with C-block helpers, writing line by line like previous examples can be cumbersome - you’ll probably want to write small blocks in a single multiline statement like this:
if (writeClass)
{
    if (writeDispose)
    {
        w.WriteLine(
        @"protected virtual void Dispose(bool disposing)
        {
            base.Dispose()
        }");
    }
}
The problem is that in the code above I made the string aligned with the control logic, to be visually clear. But the output would be this (assuming that TextWriter is at IndentLevel=0):
protected virtual void Dispose(bool disposing)
        {
            base.Dispose()
        }
To make the output code correctly indented, you would have to use Mixed Indentations, where control logic has its own indentation, and output code has another:
if (writeClass)
{
    if (writeDispose)
    {
        w.WriteLine(
@"protected virtual void Dispose(bool disposing)
{
    base.Dispose()
}");
    }
}
Looks ugly, isn’t it? This mixed-indentation problem also affects T4 templates, as you can see in the previous T4 template sample screenshot that I posted above. And as you’ll notice, T4 templates can get even worse because the syntax highlighting may get totally crazy (or not work at all) and you won’t be able to tell apart what is control logic and what is output code.
As you can see, when you write multiline statements if you want to correctly control indentation and whitespace you’ll have to use mixed indents of the generating code and the generated code, and that gets very confusing. If you indent the strings to the right (to be aligned with the outer control code), you’ll get extra indents in your output, which may not be desirable.
(And, yes, I’m aware that there are code formatting tools like Roslyn, but yet, having manual control over code is a good idea, and more than this - you may want to write non-C# code that can’t be automatically formatted)
Solving multi-line strings
To make the multi-line blocks a little less confusing (avoid “mixed indent levels”) I created a helper method which would allow me to write multiline string with any number of padding spaces (to make it aligned with the outer generating code), and yet those spaces will be ignored. Whenever I write a multi-line block, my helper assumes that the block should follow the current indentation level (of Scripty TextWriter), and do not add any further indentation.
if (something)
{
    if (something)
    {
        if (something)
        {
            w.WriteLine(@"
                namespace codegencs
                {
                    public class Test1
                    {
                        // My Properties start here
                    }
                }");
        }
    }
}
In case, my helper method will realign this whole block to the left, docking the outermost line to the left, while respecting “internal” indentation. So assuming that the current TextWriter was at IndentLevel 0 we get this output:
namespace codegencs
{
    public class Test1
    {
        // My Properties start here
    }
}
And if the TextWriter was at IndentLevel 1 we get this output:
    namespace codegencs
    {
        public class Test1
        {
            // My Properties start here
        }
    }
PS: Not only the block is docked to the left (removing from all lines the maximum number of spaces) but also we ignore the first empty line, which allows us to put the opening@" in a single line, making the first line correctly-aligned with the following lines.
// this
w.WriteLine(@"
        public class Test1
        {
            // My Properties start here
        }");

// is a little better than this, right?
w.WriteLine(
        @"public class Test1
        {
            // My Properties start here
        }");
Integrating a real Templating Engine
Now that indentation and multiline strings were more readable, the next step was to allow templates with more logic, and mostly with reusable code (functions or subtemplates). As I explained above, Scripty does not have ambition to be a Templating Engine, or even to have one integrated, so it was clear that I should integrate into Scripty a real engine like RazorEngine, Scriban or Dotliquid.
RazorEngine has good extensibility, it looked promising. I wrote my own BaseTemplate and registered it to be injected for all templates. The idea was to get the underlying Scripty TextWriter.
Basically I had this:
public class RazorIndentedTemplate<T> : TemplateBase<T>
{
    private readonly TextWriter _tw;

    public RazorIndentedTemplate(TextWriter tw)
    {
        _tw = tw;
    }
    public override void Write(object value)
    {
        _tw.Write(value);
    }

    public override void WriteLiteral(string literal)
    {
        _tw.Write(literal);
    }
...
    public override TemplateWriter Include(string name, object model, Type modelType)
    {
        return new TemplateWriter(w =>
        {
            var scripty  = ((Scripty.Core.Output.OutputFile)this._tw);
            scripty.IndentLevel++;
            Razor.Run(name: name, writer: this.CurrentWriter, modelType: modelType, model: model);
            scripty.IndentLevel--;
        });
    }
}
And then in your template:
var config = new FluentTemplateServiceConfiguration(c =>
    c
    //.WithEncoding(RazorEngine.Encoding.Raw)
    .WithBaseTemplateType(typeof(RazorIndentedTemplate.RazorIndentedTemplate<>))
    .ActivateUsing(context => (ITemplate)Activator.CreateInstance(context.TemplateType, writer))
);
using (var service = RazorEngineService.Create(config))
{
...
}
With the code above, everytime that I included a subtemplate (using @Include("Subtemplate")) I could find the TextWriter, and increase the indent level.
That’s not what I wanted.
I wanted that indent to be increased according to the inline position of the cursor:
string razorTemplate = @"
    public class Class1
    {
        @Include("Class1Method1") // this SHOULD increase indent level.
    }
    @Include("otherclass") // this should NOT increase indent level.
";
In other words, I wanted includes to respect parent indentation even if the parent indentation was inline defined by some spaces right before the include.
So I needed to get current cursor position (how many characters after the last line break, but not counting indent spaces added by Scripty). Scripty OutputFile does NOT allow me to get that, and also does not allow me to replace it’s OutputFile by my own implementation (like RazorEngine does), but it allows to pass an inner text writer.
I don’t remember if I really managed to make it work (I think I just gave up and decided to write my own before it), but it was certainly turning into a Frankestein:
- In my template (outside Scripty) I would had multi-line helper.
- In my template (outside Scripty) I would had indentation helper.
- In my template I would have a PositionableTextWriter (to keep track of cursor position in current line), and would pass this as inner writer of Scripty OutputFile.
- In another assembly I had to create my new RazorBaseTemplate, and register it to RazorEngine. Which in case would depend on my PositionableTextWriter.
- Razor includes would automatically decide if they should increase indentation.
And in the end, it would still be hard to debug, bad intellisense (unless I was willing to create an individual cshtml file for each reusable block ever), and totally coupled.
Besides Scripty OuputFile which was limited, I also faced another dozen of weird problems when running Scripty (which uses Roslyn scripting, which have some serious issues like not allowing namespaces) like assembly conflicts, namespaces problems, etc, all hard to solve.
So after frustration with both Scripty and RazorEngine, I decided to write my own TextWriter not only to keep track of current cursor position, but also to completely replace Scripty indent-control.
My own TextWriter
Writing my TextWriter was basically to keep track of current cursor position, so I would have to count number of characters written after each line break. And then I added the indentation-control, similar to Scripty. And then I added my helpers methods: the one that will “trim” multi-line strings, and the one that is a shorthand for C-blocks.
Ok, all working great - Now that indentation and multiline strings were more readable, it was time to create a robust way of using subtemplates. Probably I could use RazorEngine more easily, but since I was already rewriting from scratch I thought I could just use pure C# strings as my templating engine.
This is what I had in mind:
// This is a reusable method which you can embed anywhere inside your string-interpolated templates
string RenderProperties(List<Property> props)
{
    return () => $@"
        {string.Join(Environment.NewLine, props.Select(prop => $"public {prop.Type} {prop.Name} {{ get; set; }}"))}";
}
public void GenerateMyClass()
{
    List<Property> props = new List<Property>() { new Property() { Name = "Name", Type = "string" }, new Property() { Name = "Age", Type = "int" } };
    var w = new TemplateTextWriter();
    string myNamespace = "codegencs";
    string myClass = "Test1";
    w.Write(@"
        namespace {myNamespace}
        {
            public class {myClass}
            {
                // My Properties start here
                { RenderProperties(props) }
            }
        }");
}
The problem with this is that my Write method (yes, that one which can handle multiline strings) will receive as argument a single string. And this is what it would output, since the included method renders a linebreak and has no idea of inline indentation:
namespace codegencs
{
    public class Test1
    {
        // My Properties start here
        public string Name { get; set; }
public int Age { get; set; }
    }
}
And as you may have noticed, I’m a little obsessed with whitespace control, so the whitespeak freak got angry again because this way of using subtemplates wouldn’t work. Subtemplates should “respect current indent” even if the indent was implicitally defined by some spaces before the subtemplate was included.
Why not C# ?
Since my TextWriter was fully C# (no templating language), and it was doing a good part of what I needed, why not do the whole subtemplating thing in C#? All I had to do is finding a way to capture current cursor position before starting a subtemplate. In other words, I wanted “inline templates” which should be executed while preserving the current indentation.
If it sounds weird to output C# code using C# code (really?), let me give some good reasons:
- Compiled, typed, compile-time checking
- Full IDE support. The IDE which you are already familiar. With debugging support.
- Runs in .NET Standard and .NET Core
- Full access to all C# Framework. You can connect to SqlServer, you can use Newtonsoft JSON, etc.
- Full C# framework - you’re not limited to a small subset of string-manipulation functions.
After all those reasons, all I can think is “Why hadn’t this been done before”.
Interpolated Strings to the Rescue
As I explained above my inline templates would have to “capture” the current cursor position, and therefore I would have to process the inner template only after the outer template (at least the parts which precede the inner template) had been processed/written.
Now comes the interesting part…
As soon I started exploring how I could control the rendering of the interpolated strings, I discovered that string interpolation is not only syntactic-sugar offered by the compiler, but it also translates into a class FormattableString which offers the format and the arguments individually, and that would be a perfect use for outer template (format) and inner templates (arguments):
Func<List<Property>, FormattableString> RenderProperties = (props) => ...
string myClass = "Test1";
writer.Write($@"
    public class {myClass}
    {{
        // My Properties start here
        { RenderProperties(props) }
    }}");
… is translated into this:
Func<List<Property>, FormattableString> RenderProperties = (props) => ...
string myClass = "Test1";
writer.Write(FormattableStringFactory.Create(@"
    public class {0}
    {{
        // My Properties start here
        {1}
    }}", new object[] { myClass, RenderProperties(props) } );
PS: since interpolated strings use braces as control character, we have to use double braces for escaping braces.
FormattableStringFactory.Create creates an object of type FormattableString, which has the format and the arguments.
If my Write method expects a string, the FormattableString is implicitally converted into a regular string (and in case double braces will be rendered as single braces).
On the other hand, if method expects a FormattableString, we can use the format and arguments explicitly - so we can process the format block by block, and when we reach each argument {X} we can “save” the current position and therefore preserve the current indentation.
So all I have to do is process (writing to output) the string format until I found the embedded argument, then process the inline argument, and repeat until the end of the string format. So with string interpolation we can embed complex subtemplates inside the parent template, while respecting the “cursor position” where the inner template starts.
// This is a reusable method which you can embed anywhere inside your string-interpolated templates
Func<FormattableString> RenderProperties(List<Property> props)
{
    return () => $@"
        {string.Join(Environment.NewLine, props.Select(prop => $"public {prop.Type} {prop.Name} {{ get; set; }}"))}"
    ;
}
public void GenerateMyClass()
{
    List<Property> props = new List<Property>() { new Property() { Name = "Name", Type = "string" }, new Property() { Name = "Age", Type = "int" } };
    var writer = new TemplateTextWriter();
    string myNamespace = "codegencs";
    string myClass = "Test1";
    writer.Write($@"
        namespace {myNamespace}
        {{
            public class {myClass}
            {{
                // My Properties start here
                { RenderProperties(props) }
            }}
        }}");
}
And the output is:
namespace codegencs
{
    public class Test1
    {
        // My Properties start here
        public string Name { get; set; }
        public int Age { get; set; }
    }
}
As you can see, the inner block has multiple lines, and yet all those lines were written in the same position where the first line started. In other words, the inner block was fully written in the “current cursor position”. And again, if the text writer had indent level 1, all that output (outer and inner template) would have 4 more spaces before each line. Cool, uh?
For my inner template I used a Func<FormattableString> but it could be other types like string, Func<string>, or FormattableString itself. They would all be evaluated “on demand”, only by the moment we need to output those parameters.
FormattableString is automatically created by the compiler when you write an interpolated string.
The core method of my TextWriter is below, and basically it will get the format string, split by the arguments ({0}, {1}, etc, which are automatically generated by the compiler when you write a regular interpolated string), and will write (respecting current indent level, etc) a small part of the string format “up to the next argument”, then it will process the argument, which might be another interpolated string (entering into recursion), or might be a more reusable callback function, or just a plain string, and repeat until the end of the string.
#region WriteFormattable(string format, params object[] arguments) - Basically, we split any interpolated string, and write block by block, doing lazy-evaluation of arguments.
/// <summary>
/// This is the "heart" of this class. Basically, we split any interpolated string, and write block by block, doing lazy-evaluation of arguments.
/// The idea of writing Func<FormattableString> is that we do NOT evaluate the {arguments} BEFORE the outer string is being written - they are only evaluated when needed
/// so we can capture the cursor position in current line, and preserve-it if the arguments render multi-line strings
/// </summary>
public void WriteFormattable(FormattableString formattable)
{
    string format = formattable.Format;
    if (_trimBlockPaddings)
        format = TrimLeftPadding(format);
    if (_trimFirstEmptyLine)
        format = this.TrimFirstEmptyLine(format);
    object[] arguments = formattable.GetArguments();
    var matches = Regex.Matches(format, @"{\d}");
    int lastPos = 0;
    for (int i = 0; i < matches.Count; i++)
    {
        // unescape escaped curly braces
        string text = format.Substring(lastPos, matches[i].Index - lastPos).Replace("{{", "{").Replace("}}", "}");
        base.WriteWithIndents(text);
        // arguments[i] may not work because same argument can be used multiple times
        var arg = arguments[int.Parse(matches[i].Value.Substring(1, 1))];
        if (arg as FormattableString != null)
        {
            base.ExecuteInlineAction(() =>
            {
                FormattableString subText = (FormattableString)arg;
                this.Write(subText);
            });
        }
        else if (arg as Func<FormattableString> != null)
        {
            base.ExecuteInlineAction(() =>
            {
                Func<FormattableString> subText = ((Func<FormattableString>)arg);
                this.Write(subText);
            });
        }
        else if (arg as Action<TemplateTextWriter> != null)
        {
            base.ExecuteInlineAction(() =>
            {
                Action<TemplateTextWriter> action = ((Action<TemplateTextWriter>)arg);
                action(this);
            });
        }
        else if (arg as Action<TextWriter> != null)
        {
            base.ExecuteInlineAction(() =>
            {
                Action<TextWriter> action = ((Action<TextWriter>)arg);
                action(this);
            });
        }
        else if (arg as Func<string> != null)
        {
            base.ExecuteInlineAction(() =>
            {
                string exec = ((Func<string>)arg)();
                this.Write(exec);
            });
        }
        else if (arg as string != null)
        {
            base.ExecuteInlineAction(() =>
            {
                string subText = ((string)arg);
                this.Write(subText);
            });
        }
        else
        {
            base.ExecuteInlineAction(() =>
            {
                this.Write(arg.ToString());
            });
        }

        lastPos = matches[i].Index + matches[i].Length;
    }
    string lastPart = format.Substring(lastPos).Replace("{{", "{").Replace("}}", "}");
    base.WriteWithIndents(lastPart);
}
#endregion
And the indentation control basically will split all writes line-by-line, and for each new line will add indent before the text:
#region WriteWithIndents(string value): writes line by line, and writes the indent strings before each new line
/// <summary>
/// This is the "heart" of this class. Basically, we split any multi-line string, and write line by line.
/// Before writing each new line we write the indent block, which could for example be 8 spaces (4 spaces in first indent level and 4 spaces for second indent level),
/// or 2 tabs (one for each indent level), or any combination.
/// </summary>
/// <param name="value"></param>
protected void WriteWithIndents(string value)
{
    if (string.IsNullOrEmpty(value))
        return;

    var matches = _lineBreaksRegex.Matches(value);

    int lastPos = 0;
    for (int i = 0; i < matches.Count; i++)
    {
        string line = value.Substring(lastPos, matches[i].Index - lastPos);
        string lineBreak = value.Substring(matches[i].Index, matches[i].Length);
        lastPos = matches[i].Index + matches[i].Length;

        // if _dontIndentCurrentLine is set, it's because we're starting an inner block right "at cursor position"-  no need to indent again - we're already positioned!
        if (line.Length > 0 && _currentLine.Length == 0 && !_dontIndentCurrentLine)
            this.WriteIndent();

        this.WriteRaw(line);
        if (_normalizeLineEndings)
            this.WriteRaw(_innerWriter.NewLine);
        else
            this.WriteRaw(lineBreak);
        _currentLine.Clear();
        _dontIndentCurrentLine = false;
    }
    string lastLine = value.Substring(lastPos);

    if (lastLine.Length > 0 && _currentLine.Length == 0 && !_dontIndentCurrentLine)
        this.WriteIndent();
    this.WriteRaw(lastLine);
    _currentLine.Clear().Append(lastLine);
    _dontIndentCurrentLine = false;
}
#endregion
Other than this, the last magic part is this function, which will “save current cursor position”, and will start a new “inline write”. For example, suppose that the outer template has implicitally written 4 spaces and then we’re starting an inline action, the TextWriter will “save” this 4 spaces, write the first line (no need to indent because it was “implicitally indented”), and then will explicitly indent the next lines with this same 4 spaces. (Would also work for tabs, or any other indentation string).
/// <summary>
/// If the current line has some manually-written whitespace, this method will "save" current cursor position, and in case the inline action writes a multi-line text,
/// the subsequent lines (after the first) will "preserve" the cursor position by adding this extra indent.
/// ("manually-written whitespace" does not count the automatic indents written by this class).
/// </summary>
protected void ExecuteInlineAction(Action inlineAction)
{
    string indent = _currentLine.ToString();
    if (indent != null && indent.Length > 0 && string.IsNullOrWhiteSpace(indent))
    {
        this._levelIndent.Push(indent); // we could convert tabs to spaces or vice-versa
        _dontIndentCurrentLine = true;
        _currentLine.Clear();
        inlineAction();
        this._levelIndent.Pop();
    }
    else
    {
        inlineAction();
    }
}
Hope you enjoyed as much as I did.
On next posts I may explore some new ideas, or maybe just develop some nice templates.
Full source code here